Sew a simple lined curtain panel that is the basis for a variety of styles
The right curtains can make a room! They can be the star and set the tone for the space or they can serve as a backdrop to bring elements in the room together. You might choose a beautiful vintage floral pattern that is the inspiration you need to decorate a cottage-style room. A white, gray or beige curtain can add texture to a neutral space.
But finding the perfect curtains for your room might not be that easy. Unless you pay for custom curtains, it can be difficult to find the perfect color, pattern and fabric that you like in the perfect length. Even if you just want a solid white curtain, it might be difficult to find it in a beautiful linen texture. If you want your curtains to be hung high and wide, the 84-inch-length panels that are sold in most stores will not do the trick.
Table of Contents
ToggleMake your own curtains!
Why not make your own curtains?!? There are thousands of fabrics to choose from. You can order samples online, or buy them in a store and find exactly what will work in your room.
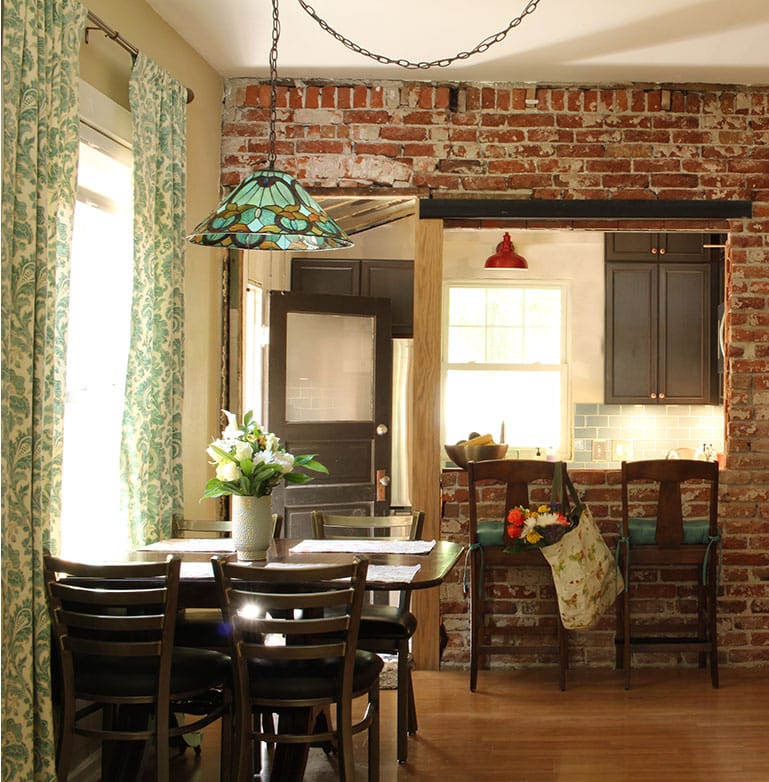
This is my son’s craftsman cottage. My daughter and I made the curtains at the window. My son’s fiancée picked out the fabric. You can see how it ties together the colors in the room and accents the cottage feel.
Where to buy fabric
Fabric can be very expensive, but there are deals if you look for them. Joann Fabrics and Hobby Lobby frequently run sales on decorator fabrics. I have gotten a lot of fabric from Fabric Guru. They carry affordable options through more expensive designer fabrics. Be sure to check their site for remnants. I recently found a fabric that I wanted for my bedroom curtains. As I scrolled, I noticed that there was a remnant of my chosen fabric in the exact amount that I needed. The listing for it indicated that it was damaged. Since it was less than half the full price, I decided to try it. I scoured it when it came, and I only found one small hole that I was able to hide. I may have gotten lucky, but it’s always worth a look.
If you are a novice at sewing, it’s a good idea to choose fabrics that are listed as drapery fabrics. You don’t want something that is heavy and difficult to manage when sewing curtains. Most cotton and linen fabrics will work and be easy to sew. Lining fabrics are also usually labeled as such. They typically are available in white and cream. I like white, because the lining is what will show to the outside of the house through the windows. This is completely a personal preference, though.

This is my family room where I wanted the curtains to be a neutral linen. I chose this fabric because the design adds some style while maintaining a neutral look.
How to calculate the amount of fabric needed for your curtains
Measure for the length of your curtain
• Install your curtain rod. I like mine to be about halfway between the ceiling and the top of the window trim, but you can place it higher or lower depending on your personal preference.
• Determine how you want to hang your curtain. Do you want to create a rod pocket and slide it over the curtain rod or do you want to clip it to rings with clips?
• Measure from the curtain rod or clips to the floor. If you are making a rod pocket, measure from the bottom of the curtain rod. For clips, place the rings with the clips on the rod and measure from the top of the clip to the floor
• Add hem, rod pocket and seam allowance. Add 6 inches for your bottom hem. If you are making curtains with a rod pocket, add 4 inches for a 1 ½ inch rod. If you plan to attach your curtain to clips, add ½ inch for a top seam allowance.
Measure for the width of your panels
Typically, you should measure the width of your window and double it if you want your curtains to close and look full and not skimpy. If you are using a blind or shade for privacy, and you just want your curtains to be decorative, you don’t have to follow this guideline to the tee. Unless you are making curtains for a bay or bow window, or an especially wide window, you can probably make 54-inch panels work. Since most decorator fabrics are 54 inches wide, this eliminates a lot of cutting.
Determine how much fabric to buy
Use the measurement that you came up with when measuring for length and refer to the examples below to determine how much fabric to buy.
Rod pocket panel example:
89 inches from bottom of rod to floor
6 inches for bottom hem
4 inches for top rod pocket
99 inches for a 54-inch wide panel (I would buy 3 yards to give yourself room for mistakes.)
*Buy the same amount for the lining
Clip example:
89 inches from top of clip to floor
6 inches for bottom hem
½ inch for top seam allowance
95 ½ inches (Again, I would buy 3 yards).
*Buy the same amount for the lining
Make your simple curtain panel!
Now that you have your fabric, you’re ready to make your panel.
Materials needed to make a curtain panel
(section contains affiliate links)
• Sewing machine
• Curtain fabric (see measurement guidelines, below)
• Lining fabric
• Thread to match fabric
• Sewing shears or a rotary cutting tool
• Cutting mat (optional but highly recommended)
• Ruler with lip edge to use with cutting mat (again, optional but highly recommended)
• Fabric marker (not essential, but very helpful
Cutting your fabric
I think that cutting the fabric is the most difficult part. Once you have everything cut out, the rest is a breeze. When sewing curtains, it’s important that the fabric is straight. I use a cutting mat and a rotary cutter. They’re a little pricey, but they make the job so much easier. I use this rotary cutter and this mat. You’ll also need the ruler that has a lip edge on it. It fits over the edge of the mat and allows you to cut along a straight edge.
If you’re using 54-inch fabric, you will keep the full width for the curtain panels, but you will need to cut it to the appropriate length. This is my process using a cutting mat and rotary cutter:
• Measure each long side of the fabric against the long side of your cutting mat. If you are making curtains that are longer than 36 inches, you will have to mark 36 inches with your finger and slide the fabric up to measure a second 36 inches, and so on.
• Make a mark at the correct length (the length you you calculated)
• Fold the top of the fabric down to the marks that you made on each side and in the middle and smooth with your hand
• Measure from the fold on each side and in the middle down to the point where the top edge of the fabric has landed make sure each measurement is the same (it should be one half of the full length that you need for your panel).
• Make several marks at the correct length across the full 54 inches
• Lay the fabric on the mat and and place the ruler along one of the guidelines on the mat.
• Use the rotary cutter to cut a straight line.
Note: Most decorator fabrics have a selvedge edge on the sides. It is helpful if you have a heavily patterned fabric and you’re not sure what is up and what is down. The selvedge has arrows to indicate “up”. You can choose to cut off the selvedge. If you leave it, it will show on the back of your curtains. I sometimes leave it if I want as much fabric as possible for my curtains.
Lining
Cut your lining 2 inches shorter and 3 inches narrower than your curtain panels. Do the same cutting process for the lining. To cut it narrower, place the long side of the fabric along a line on the mat. Place your ruler on a line that is three inches from the line where the edge of the fabric is aligned, and use your ruler and rotary cutter to cut off the three inches.
Sewing your curtains
Once your fabric is cut out, there are really only three steps to sewing a curtain panel:
1. Hem the curtain fabric and the lining
2. Sew the sides of the curtain fabric and the lining together
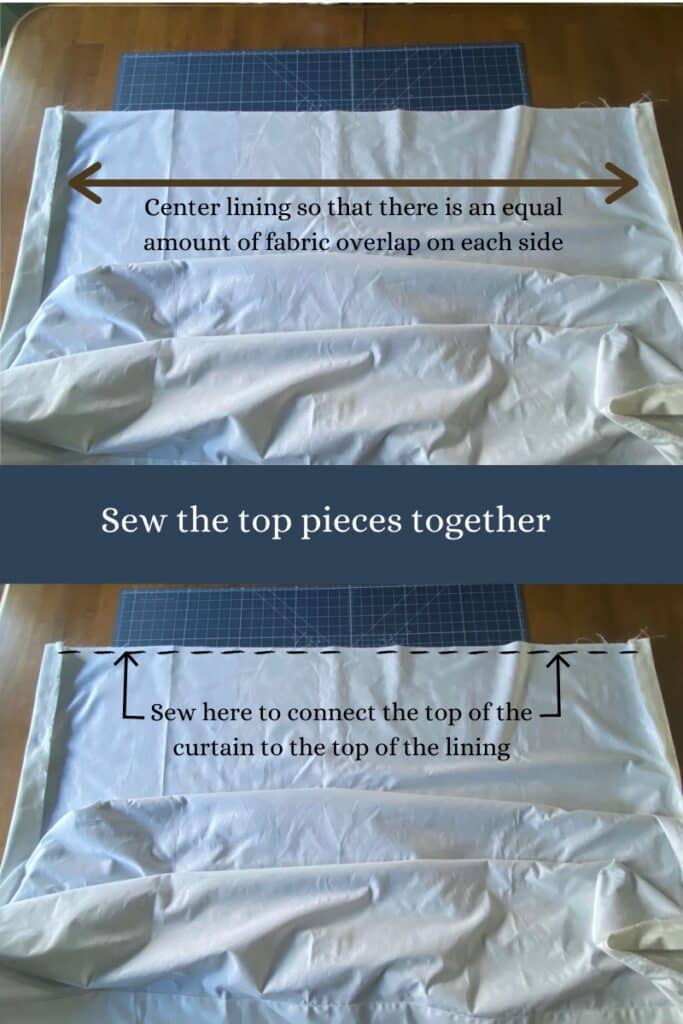
3. Sew the top of the curtain fabric and the lining together
1-Hem the curtain fabric and the lining
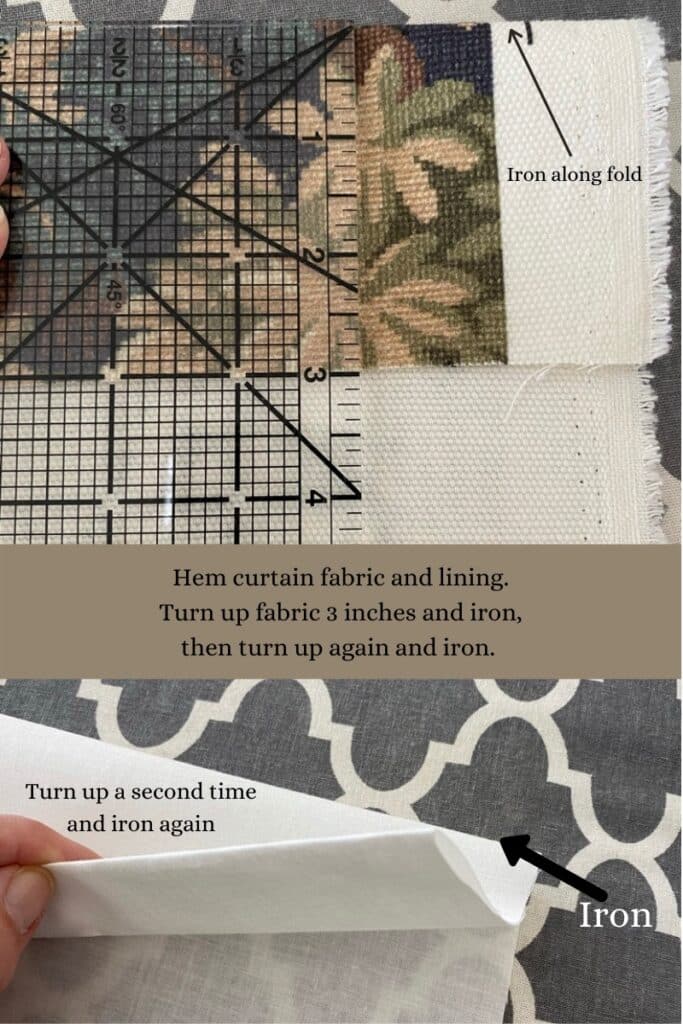
You will put a double three-inch hem in both the lining and the curtain fabric.
• Fold the bottom of the short side of your fabric up 3 inches. (Fold toward the wrong side of the fabric. A sewing gauge ruler is helpful to make sure your fold is a consistent width.)
• Iron a crease in that fold.
• Turn the fabric up again.
• Iron a crease in the second fold.
This will give you a three-inch double hem. See the illustration at right. The top photo shows the fabric turned up once, and the bottom photo of the lining shows the double hem.
I always sew the hem lining on the sewing machine and the curtain lining by hand. For the lining, I sew a straight line on the machine. I like the more custom look of hand hemming the curtain fabric, but you can certainly sew it on the machine.
Miter your curtain panel hem
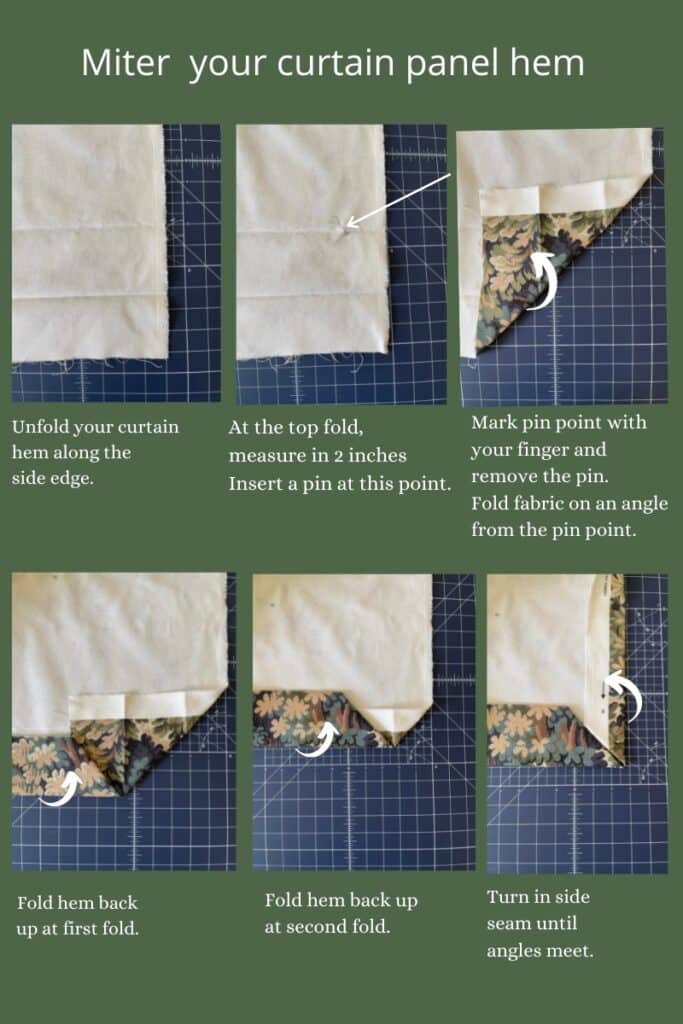
Technically, this is part of hemming. Only miter your curtain fabric–not the lining. You don’t have to do this, but it will give your curtains a more finished, custom look. This is a little hard to follow, so I created an illustration below for how to do this. Once you have folded in the miter, hem the angle on the bottom when you hem the curtain panel. The side angle will fall in when you sew your panels together. For the curtains in the illustration, I kept the selvedge edge. If you cut yours off, there will not be a white edge–both the side fold and the bottom fold will be your curtain fabric.
2-Sew the sides together
This part is easy, but don’t be confused by the end result. The lining and the curtain fabric won’t line up, but that’s what’s supposed to happen. You’ll see in the next step.
• Put the right sides of the curtain fabric and the lining together. The wrong side of the hem should be facing out on both the lining and curtain fabric.
• Line up the edges of the long sides of the lining and the curtain fabric on one side.
• Place pins perpendicular to the edge of your fabric every few inches along the side.
• Sew the pieces together with a straight line.
• Remove the pins.
• Now line up the long sides of the other side of the fabric and lining and repeat the process.
3-Sew the top edges together
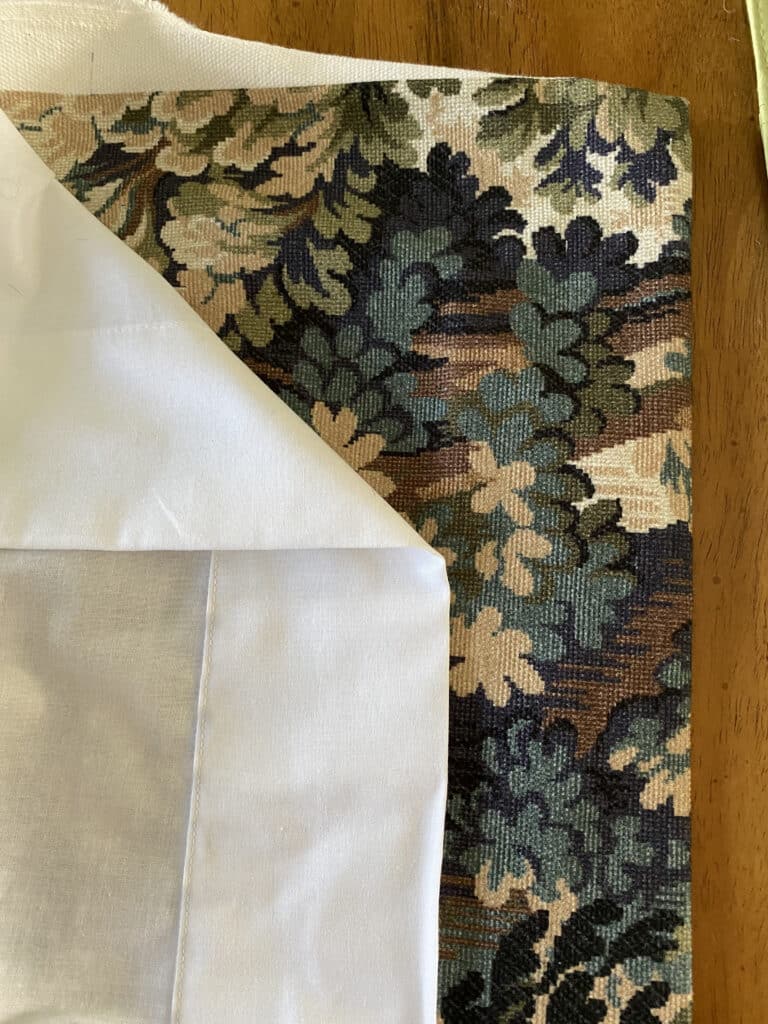
When both sides are sewn together, keep the curtain inside out and pull the fabric taught at the top, short end (the end without the hem). When doing this, center the lining on the fabric, so that there is the same amount of fabric overlap on each side. Since your lining was cut three inches shorter than the curtain fabric, there should be a 1 ½ inch overlap of curtain fabric on each side.
You can see the overlap in the illustration. Once you have your lining centered and your edges lined up, place pins perpendicular to the edge and sew a straight line.
Turn your curtain right side out and iron the seams flat.
If you allowed extra fabric for a top pocket, turn down the top edge 2 inches toward the lining. Pin in place. Sew a straight line where the top edge meets the lining. This creates your pocket.
Hang your curtains!
Now you’re ready to hang your curtains. Clip them or slide them over a rod and you have a new room!

